Search

Laura Shipman MUA

Makeup for musicians and performers

Category

Uncategorized

Charlotte Tilbury Product Review

18699677_10155001450889597_2450532396359585217_o

The first time I used Charlotte Tilbury makeup I took it for a serious endurance test. I still worked in a pub at the time so my makeup had to stand up to afternoon drinks with friends followed by a hectic bar shift. I tried Rock’N’Kohl eyeliner in Bedroom Black and Colour Chameleon in Bronzed Garnet for my eyes and K.I.S.S.I.N.G. lipstick in Night Crimson. For foundation I used Light Wonder 3 Fair, with the Wonderglow primer.

Lightwonder Foundation and Wonderglow Primer:

I found the LightWonder foundation really long lasting. There was a little bit of wear around my nose and lips, but after 14 hours with no touch ups I have no complaints about this from a light weight foundation. I loved this product as an every day foundation, it covers and evens out my skin nicely and the feel is so light I can barely tell it’s thereĀ  For special occasions (or if you just like a bit more coverage) Charlotte Tilbury offer the Magic foundation which I’m looking forward to trying as soon as possible.

The Wonderglow primer also has a lovely lightweight feel, and adds a subtle golden shimmer to the skin. I’ve tried this primer under foundation and on it’s own. Either way it gives a boost of radiance to the skin, that is especially helpful if you’re skin is a bit on the tired side (if for example you’re been drinking or have a lot of late nights).

Rock’N’Kohl Eyeliner and Colour Chameleon

The Rock’N’Kohl eyeliner is described as an Iconic Liquid Eye pencil and the Colour Chameleon is an eyeshadow pencil.
The Rock’N’Kohl eyeliner is a really nice deep black colour, but I’ve found it better for smudging and blending than I expected of something described as a liquid eye pencil. However, it certainly lives up to the claim of long lasting, I only needed to touch up once and it was still on my waterline and lowere lash line at the end of the night. The pencil is very soft, so it needs treating carefully or it’ll snap quite easily.
The Colour Chameleon range is designed to be really accessible (a theme throughout the Charlotte Tilbury brand) and is sold with recommendations for different eye colours in day and night options. I bought the Bronzed Garnet and the Amethyst Aprodisiac for green eyes; for this look I tried the Bronzed Garnet. The pencil design makes the product really easy to use, and you have a reasonable amount of time to work with it to blend it for a smokey look. I did experience some creasing with this product the first time I used it and found that it made my eyelids feel a little sticky. When I’ve used this product since I’ve set it with a little bit of translucent powder, which I found counteracted the sticky feeling and creasing. It also made it really long-lasting. My eyelids tend to be a little on the oily side so I do tend to have this problem with all cream eyeshadows.

K.I.S.S.I.N.G. Lipstick in Night Crimson

I absolutely adore this lipstick. I’ve not been this happy about a lipstick colour since Urban Decay discontinued Gash in the switch to the Vice lipsticks a few years ago. I also found the lipstick lasted really well (3 touch-ups in 14 hours, 1 after eating), although I always apply my lipstick, blot and then apply a second coat which helps. The consistency is really nice as well. I struggle with lipstick sometimes because of really dry, chapped lips, but this moisturising lipstick goes on really nicely.


As you can tell I was absolutely thrilled with my first experience of Charlotte Tilbury makeup. The products really lived up to my expectations and I can’t wait to try more of them.
The brand is also really accessible (you can literally shop by look), cruelty-free and has a wide range of vegan products.

Product Review: Nyx Lipsticks

20160509_174444

Left to Right: Jumbo pencil in Maroon, soft matte lip cream in Transylvania, Liquid Suede in Stone Fox and Vamped Up

Maroon:

The texture is really smooth and creamy so it applied very easily. There is a bit more red in the colour than I was hoping for but I still like it. The pencil is also long wearing, I tested it when I was working in a bar. This meant it had to last for 8 hours, with eating and drinking, and it survived with only minimal wearing.

Transylvania:

A matte, liquid lipstick in a non-drying formula. However, because of the liquid consistency if your lips are already dry this lipstick doesn’t apply as easily as the pencil. It does pick up chapping, but not as badly as other liquid formulas. Tested under the same conditions as Maroon it did just as well.
If you like a a dark, vampy, purple/red then this is a great cheap option.

Stone Fox:

Once again I’m a fan of the colour and consistency, and I love it any time a brand gets daring with their lipstick colours. Howevere the last on the Liquid Suede isn’t as good. It needs more retouching than the other two. It’s not terrible but I wouldn’t be confdent wearing it in a situation where I can’t keep an eye on it.

Vamped Up:

When I first saw this I was confused about what it was meant to be. It’s a very sheer black pencil, designed to transform a natural lipstick. It’s basically the day to night of lipsticks. It’s a good idea, but it can be a bit tricky to apply. It doesn’t always give an even finish, and it doesn’t always go well with the colour it’s applied over. I haven’t tried this yet, but I imagine it would be quite difficult to apply over a creamier base too.

Aggy G: The Photos

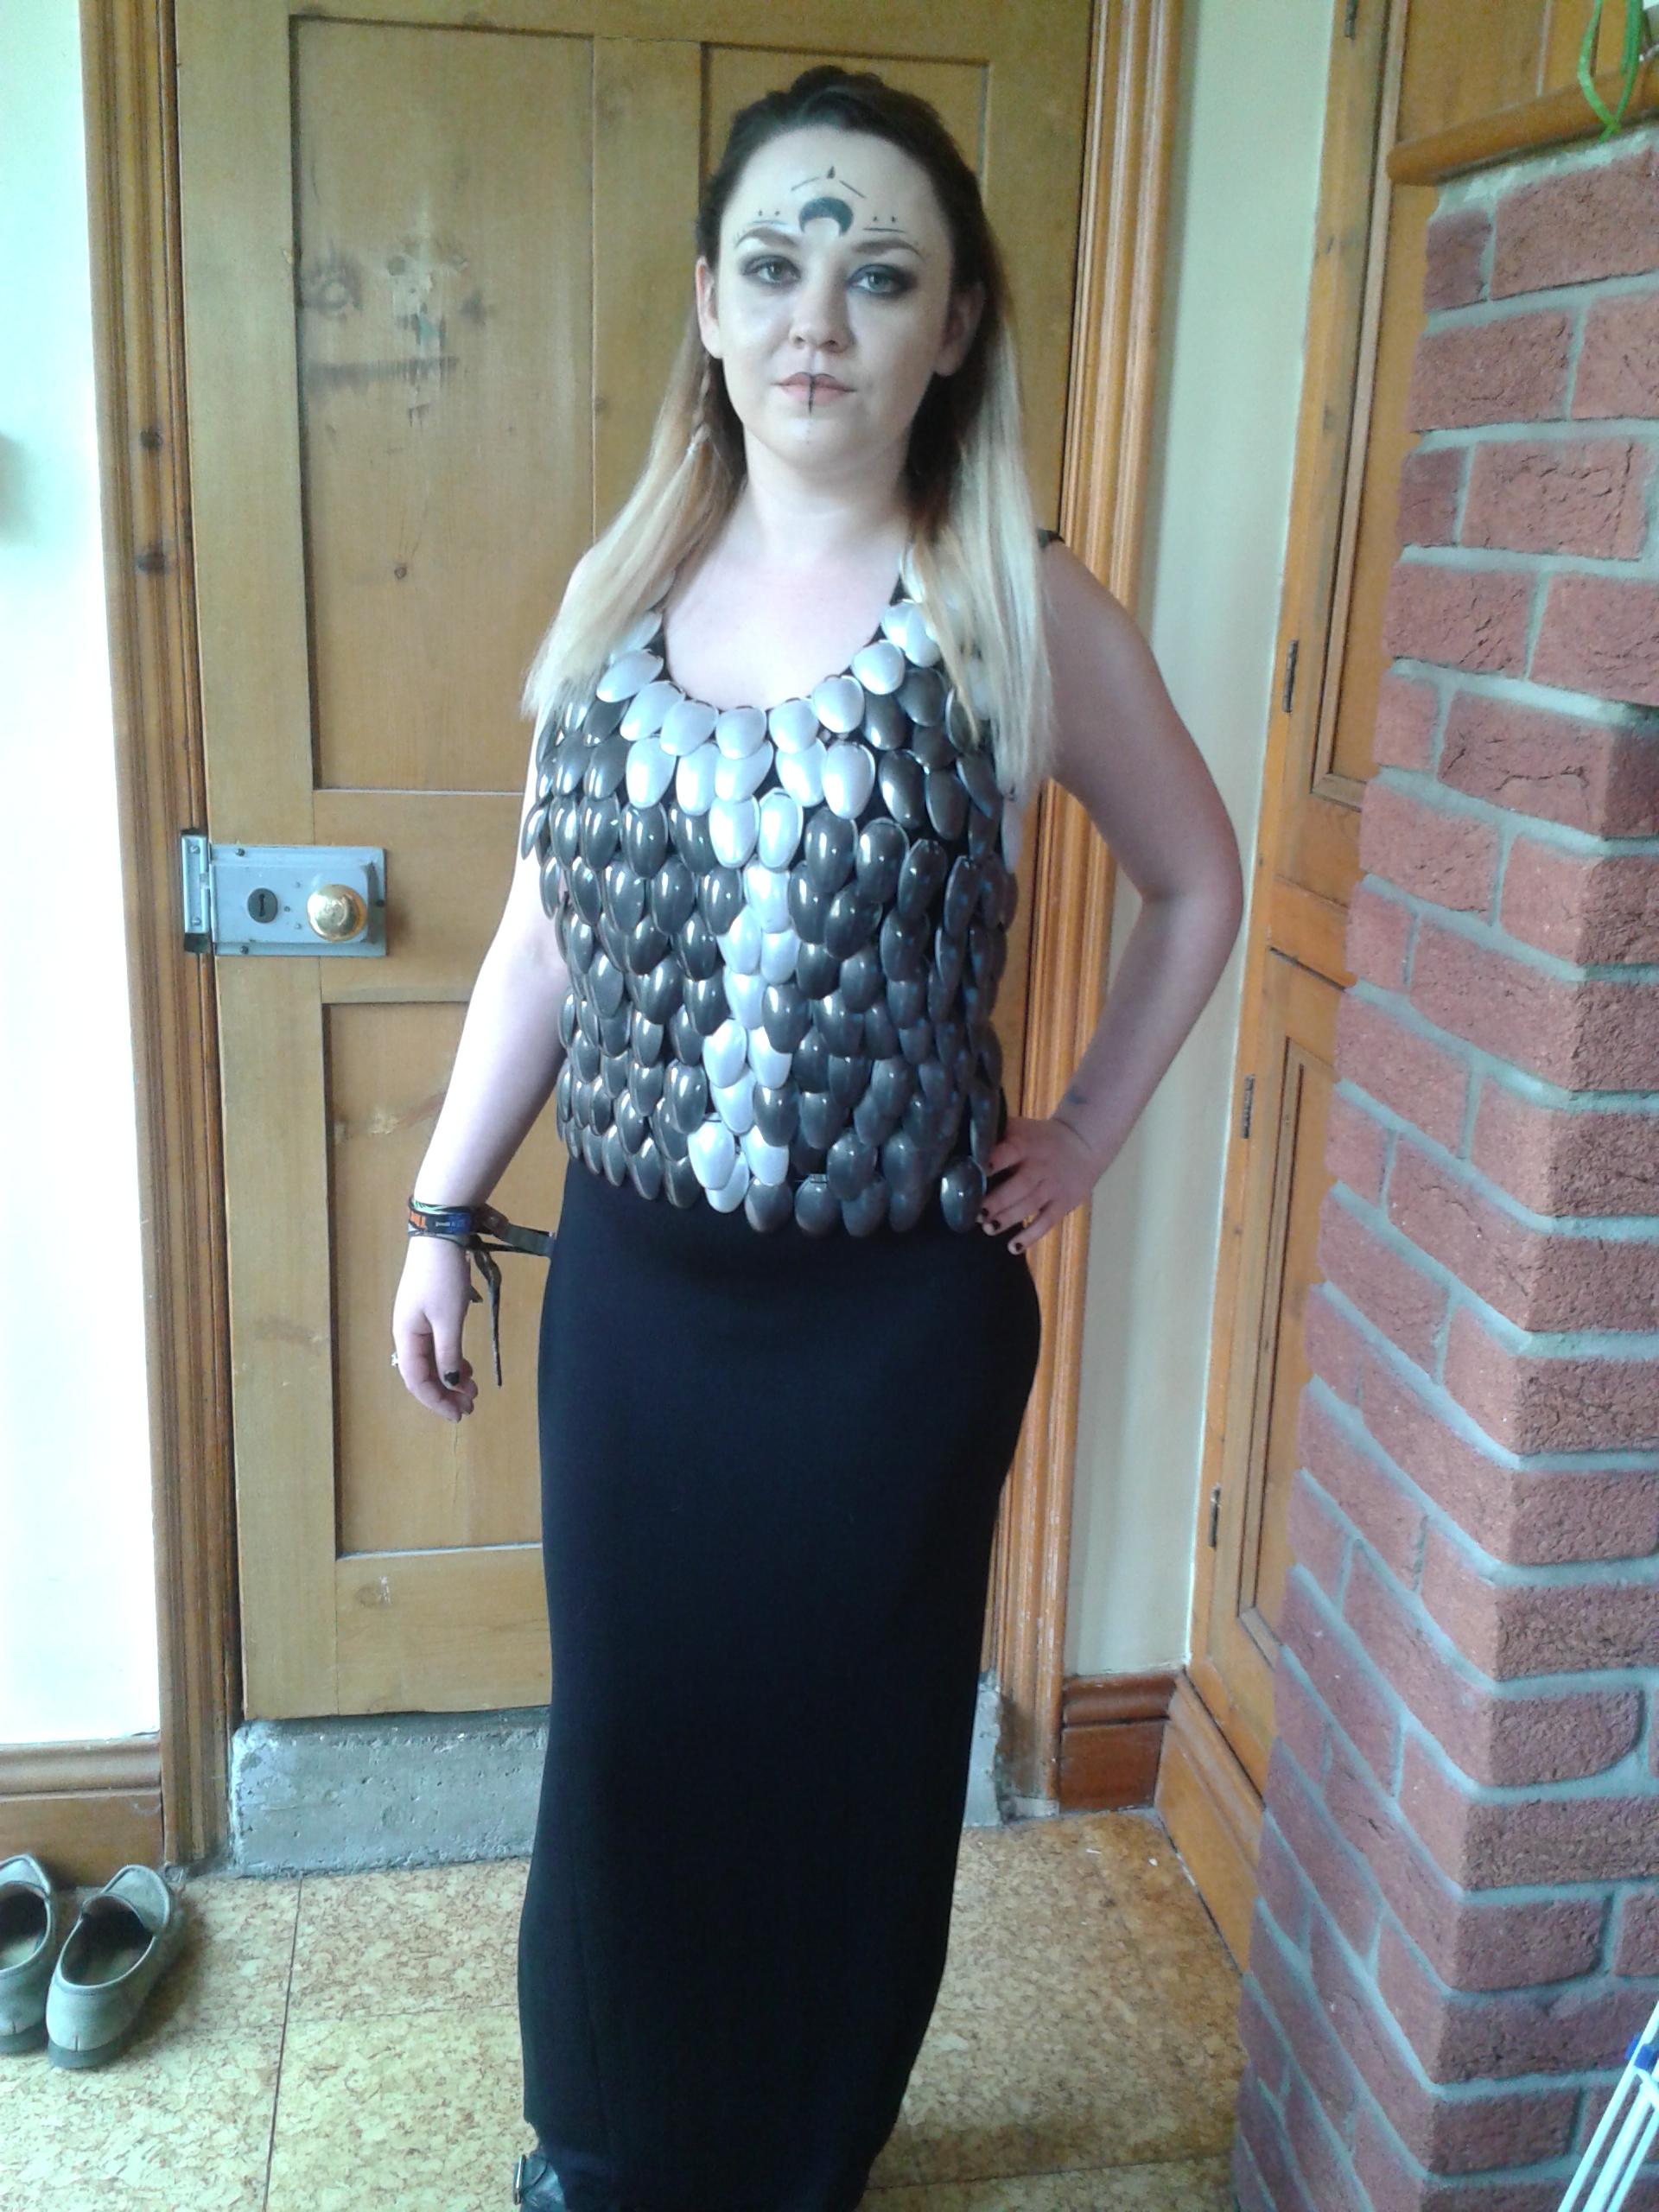
Iā€™m thrilled with how my shoot with Aggy G turned out! The metallic paint caught the light so well and I think the whole visual is really strong. The hair, makeup and styling all come together to create a cohesieve character. I also think the images and memorable and different ā€“ which is ideal for promotion.

Iā€™m glad we tried different locations, and I think itā€™s interesting how the stone backgroud reminds me of Game of Thrones but the plant based backgrounds make me think of Lord of the Rings. Iā€™m definitely taking this as a lesson on the power of the background to effect the feeling of an image.

This dragon armour project took a lot of time and work, but Iā€™m really glad I did it. This was my first attempt at costume making and Iā€™m really happy with how it turned out. This is an area I definitely want to pursue more. Sewing has never been my strong suit, so Iā€™d better get out my mumā€™s sewing machine and find some classes!


Mask making 2

I moved the injection hole (as mentioned in Mask Making) to the tip of the nose. I’m so glad I did, because I finally got a full mask! There’s only one small hole, which I’ll be able to patch.

I think the hole was caused by not sealing the original injection hole.This reduced the pressure on the foam as it was being injected, and made it more difficult to fill the mould. It also wasted product, becasue a lot of foam escaped from the hole instead of filling the mould.

Once the hole is patched I need to trim the mask down and paint. It’s so close to done now, I’m really excited!

Aggy G: behind the Scenes

20160505_164557.jpg

Iā€™ve got Aggy made up and in costume. The crescent moon is a throw back to an anime I used to love, Sailor Moon, but I kept everything in black and silver to go with the armour. I chose plaits for the hair both because I think they suit the look and because I love the way plaits look in ombre hair. The black maxi dress was used to hide any holes in the scales, and once it was cut to length the extra fabric made a great cover for Aggyā€™s festival wristbands.

Itā€™s off to the park to shoot! Iā€™m lucky that just across the road from my house is a park with lots of different possible back drops. Thereā€™s all kinds of plants and trees, bridges and a rock garden. My only worry is the sun (as much as Iā€™m loving the beautiful weather) it can make taking photos a lot harder.

Mask Making

20160428_192056

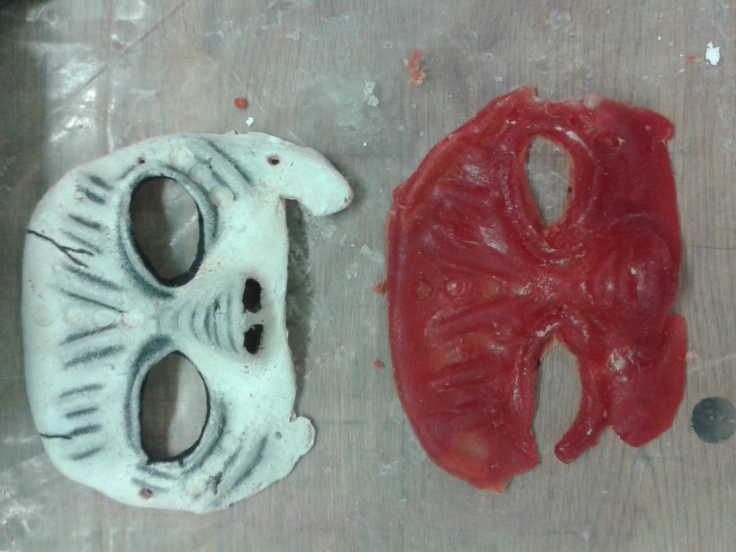
Iā€™ve tried running my mask twice now, in foam and gelatine. The mould didnā€™t fill properly either time, which suggests I need to move the injection hole. Iā€™m going to drill another one at the tip of the nose, moving it down from between the eyebrows. This should help the product get around whatever is causing the problem.

However, I will not be running the mask in gelatine again. Although the translucent red looked really good the weight, even as a half mask, was too much. If my client wore the gelatine mask for a performance it might break or tear.

I tried painting the mask white, like the face paint my client wears. However I donā€™t think it looks as stong as the red, but I do like the silver highlighting. Iā€™ll try and bring that in to the full face piece when I have one.

Practicing Paint

I wanted to be able to practice painting my mask, before I ran my foam piece. To do this I ran slip latex pieces ā€“ which is where liquid latex is brushed in to the mould. This gives a rough version of how the piece will look, but it doesnā€™t fill all the space in the mould the way foam, silicone or gelatine would.

I tried both clear latex that I painted red and red latex. I definitely prefer the results I got with red latex. I had a harder time contouring the painted red piece, the paint got quite muddy.

When I had the red latex piece I also tried adding in the spikes my client asked for, to see how well they stood out. Attaching things to prosthetics or masks can pull at or distort the piece, but because Iā€™m using plastic spikes theyā€™re very light. That minimises the risk of damaging the piece.

Ombre Jeans

20160504_174924

I saw some jeans on Pinterest that were white at the top and blck on the legs. I liked the idea, but I thought it would look better the other way up.

I started by soaking some black jeans in bleach mixed with water. I did this twice, leaving the jeans for about an hour each time. I used about Ā¾ of a bottle of bleach in each bowl of water.Ā  I then rinsed out the jeans. I thought they would need bleaching again. After I washed the jeans they were much lighter, mostly almost white, Unfortunately the jeans wereĀ  a bit patcy at the top of the legs.

I decided to combat this by dyeing the jeans. I chose pink (one of my favourite colours) but it was such a large area that I decided to go with powder pink insteadĀ  of bright pink. I used the new Dylon dye, with the salt added. It was so easy ā€“ just throw the jeans and they dye powder in the washing machine and run twice. Once to colour and once to rinse.

They still look a bit patchy. Next time I dye clothes I will try to make sure the base is even.

Tutorial: Galaxy Shorts

I’ve seen a lot of galaxy themed things on pinterest recently. Galaxy hair, galaxy nails and galaxy shorts just to start. Since getting a nice manicure would be a waste right now and I can’t afford galaxy hair, I decided to make myself some galaxy shorts.

Step 1:

Take a pair of black shorts and your paint (I used pearlescent red, blue and purple fabric paints) and roughly sponge the first colour across the shorts.
Add the other two colours, overlapping the paint in some places.

Once I finished layering my paints I wasn’t happy with my colours. The pearl in the paint made everything look too silver and the colours were really hard to tell apart.

Step 2:

20160413_171142

I took acrylic paints in different shades of purple and blue, and sponged them across on top of the pearlecent paint to reduce the shine. I then left the shorts to dry.

This looked more like I wanted it to. If you use paints you like at first this is all only 1 step haha!

Step 3:

20160413_194423

Once the paint was dry (to stop the white mixing in) I used the end of a paintbrush and white acrylic paint to create the stars. I dabbed them on in rough groups so they looked like constellations.

Blog at WordPress.com.

Up ↑